Soldering a copper pipe is one of those skills that looks intimidating the first time but becomes second nature quickly. Whether you’re fixing a leaking joint or connecting new supply lines, the process comes down to three core steps.
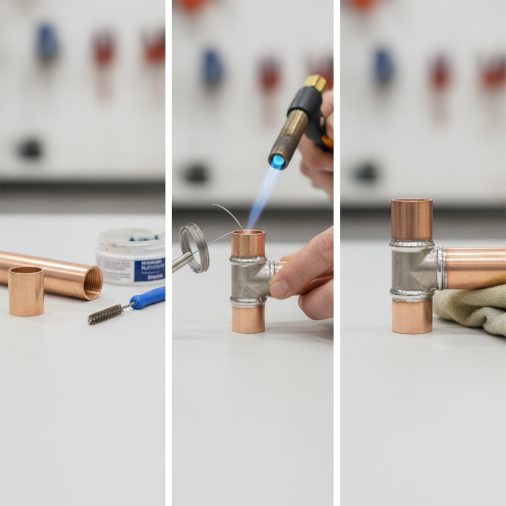
The three main steps to soldering a pipe are: clean and prepare the pipe and fitting, apply flux to both mating surfaces, then heat the joint and feed solder into it. Each step builds on the last — poor preparation leads to a failed joint, no matter how well you apply heat.
Why Each Step Actually Matters
Most failed solder joints trace back to skipping or rushing one of these three steps. Solder won’t bond to dirty copper. Flux won’t protect a surface that wasn’t cleaned. And solder drawn into an uncleaned, unfluxed joint will either bead off or create a weak, porous connection that leaks under pressure.
Getting all three steps right every time is what separates a joint that holds for decades from one that fails the first time you pressurize the system.
Step 1 — Clean and Prepare the Pipe and Fitting
Before any heat touches the copper, both surfaces need to be mechanically clean and free of oxidation.
What to do:
– Cut the pipe cleanly and squarely using a pipe cutter, not a hacksaw if you can help it. A clean, perpendicular cut seats better inside the fitting.
– Deburr the inside edge of the cut end using the reamer built into most pipe cutters. Burrs restrict flow and create turbulence.
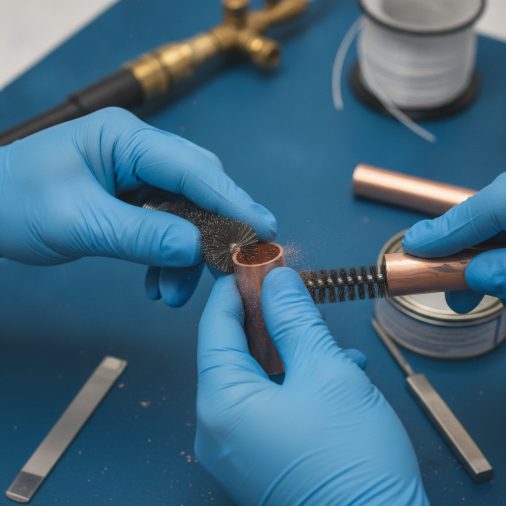
– Use a fitting brush (also called an emery pipe fitting brush) to clean the inside of the copper fitting socket. Rotate it several times until the surface is bright and shiny.
– Use emery cloth or a plumber’s fitting brush on the outside of the pipe end. Clean the same length that will insert into the fitting — typically ½ inch to 1 inch depending on fitting size.
The cleaned surface should look bright, almost silver-pink. Any dull or dark copper means oxidation is still present. Solder will not bond properly to oxidized copper.
Common mistake: Handling the cleaned surfaces with bare hands after polishing. Skin oils contaminate the copper and interfere with flux adhesion. Work quickly and avoid touching the cleaned area.
Step 2 — Apply Flux to Both Mating Surfaces
Flux is a chemical paste that does two important things: it removes any remaining oxidation when heated, and it draws liquid solder into the joint through capillary action. Without it, solder balls up and rolls off instead of flowing cleanly into the gap.
What to do:
– Apply a thin, even coat of lead-free water-soluble flux paste to the outside of the pipe end using a flux brush or an acid brush. Don’t glob it on — a thin coat is enough.
– Apply a thin coat to the inside of the fitting socket as well.
– Assemble the joint immediately after applying flux. Push the pipe firmly into the fitting until it seats fully against the fitting shoulder. Give it a slight twist to spread the flux evenly.
Lead-free flux is the standard for potable water plumbing. Using lead-based solder or paste flux on drinking water lines is no longer code-compliant in most regions.
If you’re working on a joint where residual moisture is a problem, soldering copper pipe with water still present requires a slightly different approach before you apply heat.
Step 3 — Heat the Joint and Feed Solder
This is where the joint actually forms. The key insight most beginners miss: you’re heating the copper, not the solder. The copper needs to be hot enough to melt the solder on contact — not the torch flame.
What to do:
1. Position your torch (a standard propane or MAPP gas torch works for most residential copper work) so the flame contacts the middle of the fitting, not the pipe end.
2. Move the flame slowly around the fitting to heat it evenly. Avoid holding the flame in one spot.
3. Touch the solder wire to the joint — at the point where pipe meets fitting — periodically as you heat. Keep the solder away from the flame itself.
4. When the copper is hot enough, the solder will immediately liquefy and get pulled into the joint. You’ll see it flow and wick around the circumference.
5. Feed solder until a small, consistent fillet of solder appears around the entire joint. For ½-inch pipe, roughly ½ inch to ¾ inch of solder wire is typically enough per joint.
6. Remove the flame and let the joint cool undisturbed for at least 30 seconds before handling. Do not quench it with water.
What a good joint looks like: A thin, shiny ring of solder visible all the way around the fitting edge, with no gaps or drips.
What a bad joint looks like: Uneven coverage, a cold gray appearance, or solder that beaded and dripped onto the pipe without flowing into the gap.
Tools and Materials You’ll Need
Item
Purpose
Pipe cutter
Clean, square cuts
Emery cloth / fitting brush
Surface preparation
Lead-free flux paste
Oxidation removal, solder flow
Lead-free solder wire
Forms the watertight bond
Propane or MAPP gas torch
Heat source
Flux brush
Applying flux evenly
Heat-resistant pad
Protects framing or walls
For small residential repairs, the Harris Stay-Brite 8 is a commonly used lead-free silver-bearing solder that flows at lower temperatures and makes tight joints easier to achieve for beginners.
Common Problems and How to Fix Them
Solder beads off and won’t flow into the joint
The most likely cause is insufficient heat, contaminated copper, or missing flux. Strip the joint apart, re-clean both surfaces, re-flux, and try again.
Solder flows only on one side of the joint
The fitting is heating unevenly. Work the torch around the entire circumference before feeding solder. Heat travels through the copper, so the solder follows the heat.
Joint leaks after testing
Let the system cool completely and inspect the solder fillet. If there’s a gap, you can sometimes re-heat the joint and feed a little additional solder into the gap. If the joint was poorly cleaned originally, it usually needs to be cut out and redone.
Flux turns black before solder flows
The flux overheated and carbonized. This usually happens when the torch is too close or held in one position too long. Clean and re-flux.
FAQ
Do I need to turn off the water before soldering a copper pipe?
Yes, always. Any water in the pipe will turn to steam when heated, which prevents the pipe from reaching soldering temperature. The steam pressure can also blow solder out of the joint. Drain the line fully and ensure it’s dry before beginning.
What type of solder should I use for copper water pipes?
Use lead-free solder that meets ASTM B32 standards for potable water plumbing. Most plumbing codes in the US require lead-free solder on any line that carries drinking water. Silver-bearing lead-free solders like 95/5 tin-antimony or 94/6 tin-silver alloys are common choices.
How long should I wait before turning the water back on after soldering?
Wait at least 30 minutes after the joint has cooled to room temperature before pressurizing. Rushing this risks disturbing the joint before the solder has fully solidified and the flux residue has cooled.
Can I solder copper pipe in a tight space near wood framing?
Yes, but you need to protect the surrounding material. Use a flame-resistant soldering shield or a piece of sheet metal behind the fitting. Many house fires start from soldering torches used too close to framing without protection.
Why does my solder look dull and gray instead of shiny?
A dull, gray finish usually indicates a cold joint — the solder was applied before the copper was fully up to temperature, or the joint was disturbed while cooling. A properly soldered joint should look bright and slightly glossy when it cools.
Is flux always necessary when soldering copper pipe?
In practice, yes. While solder technically contains flux compounds in some formulations, applying a separate paste flux to the joint surfaces is standard practice in plumbing and strongly recommended for reliable results. Skipping it dramatically increases the chance of a failed joint.
What’s the difference between soldering and brazing copper pipe?
Soldering uses filler metal that melts below 840°F (450°C) and is standard for residential water supply lines. Brazing uses higher temperatures and filler metals like Harris Stay-Silv 15, producing a stronger bond used in refrigeration, gas lines, and high-pressure applications. The process steps are similar, but brazing requires more heat and different materials.
The Real Takeaway
Clean copper, fresh flux, and correctly applied heat — these three elements do all the work. Rushing the cleaning step is the single most common reason beginner soldered joints fail. Take an extra minute on preparation, keep your torch moving, and let the copper pull the solder rather than trying to melt it with the flame. A joint done right the first time holds for the life of the building.