
Why Tack Placement Strategy Matters
Correct Gun Angle and Positioning for Tack Welds
Amperage, Wire Speed, and Shielding Gas Settings
Tack welds are short, but they still need proper fusion. The biggest mistake is running settings that are correct for a full weld pass but too hot for a quick two-second tack — or conversely, turning everything down so low that the tack sits on top of the metal without actually bonding to it. A good rule: use your normal welding parameters for the material thickness and wire diameter. Don’t adjust settings down for tack welds. The duration is already short, so the heat input stays manageable.| Material Thickness | Wire Diameter | Voltage (Approx.) | Wire Speed | Gas Mix |
|---|---|---|---|---|
| 16–18 gauge | 0.023" | 14–16V | 180–220 IPM | 75/25 Ar/CO₂ |
| 1/8" | 0.030" | 17–19V | 250–300 IPM | 75/25 Ar/CO₂ |
| 3/16" | 0.035" | 19–22V | 280–350 IPM | 75/25 Ar/CO₂ |
| 1/4" | 0.035" | 21–24V | 300–400 IPM | 75/25 Ar/CO₂ |
How to Execute the Tack Weld
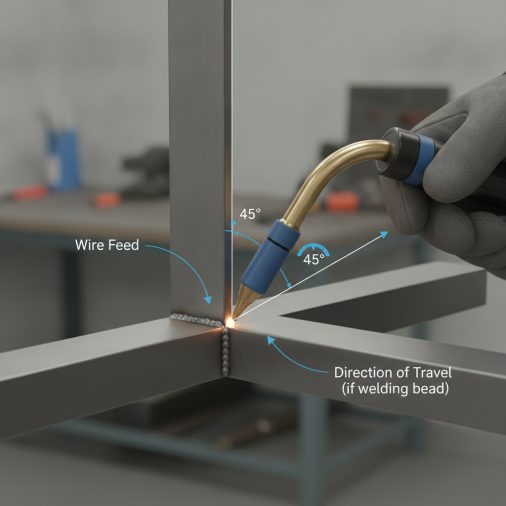
The actual motion is simple, but consistency makes the difference between a tack that holds cleanly and one that pops or leaves a glob you have to grind off. 1. Position the workpieces with proper fit-up and clamp or fixture them if needed. 2. Hold the gun steady at the correct angle before triggering. Don’t drift in while pulling the trigger. 3. Trigger briefly — typically 1–2 seconds for most thicknesses. The goal is a small, flat bead roughly 3/8″ to 1/2″ long. 4. Release the trigger and hold position for a beat before pulling the gun away. This lets the wire burn back slightly and avoids a cold stub stuck in the puddle. 5. Check fusion visually. A properly fused tack has a smooth, slightly flattened profile and shows wetting at the edges. A cold tack sits up proud with sharp edge transitions. Avoid whipping or circling the gun during a tack. The contact time is too short for torch manipulation to help — it only introduces inconsistency.Tacking Different Joint Types
Each joint configuration has specific challenges when tacking. Butt joints are the most critical for gap consistency. Tack both ends first, check the gap along the entire joint, then fill in middle tacks. If the gap opens or closes, you can sometimes correct it by tacking on the side that’s moving before it sets. T-joints and fillet joints need tacks that fully fuse into the corner. Aim the wire at the root of the joint, not just the vertical or horizontal piece. A tack that only fuses to one member is essentially a cold lap and will break under stress. Lap joints are forgiving but easy to under-penetrate on the bottom sheet. Direct the wire toward the lower piece to ensure the tack bonds both surfaces, not just the top layer. When working on auto body sheet metal or exhaust components, proper tack technique becomes even more important. MIG welding auto body panels relies heavily on stitch and tack sequences to prevent heat warping thin panels.Grinding and Blending Tack Welds
Whether you grind tacks before welding over them depends on the application and the quality of the tack itself. In structural or critical-path welding, tacks that will be incorporated into the final weld should be ground or feathered at the ends. This removes any crater cracks or abrupt starts/stops that can cause lack of fusion when the final pass runs through. For light fabrication, clean, properly fused tacks generally don’t need grinding before welding over. Run through them at normal travel speed — the arc energy will re-melt the tack and incorporate it into the bead. If a tack cracked, popped loose, or sits too high, remove it entirely with an angle grinder before proceeding. Welding over a bad tack doesn’t fix it; it buries the problem.Common Tack Weld Problems and Fixes
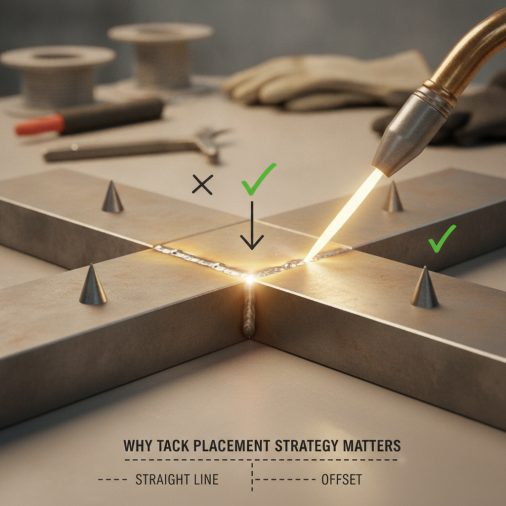
Tack pops loose under stress Usually caused by insufficient fusion — the bead sat on the surface without bonding to both base metals. Fix: increase wire speed slightly or ensure contact at the joint line, not just one piece. Tack cracks after cooling Can indicate contaminated base metal, too-rapid cooling, or hydrogen-induced cracking on higher-carbon steels. Clean the metal thoroughly before tacking and consider preheating for thicker or higher-carbon material. Tack is too convex (piled up, not flat) Voltage is too low relative to wire speed. Increase voltage slightly or reduce wire feed speed. A flat, smooth tack blends better and requires less grinding. Spatter around the tack Excess spatter often comes from too much inductance, insufficient gas coverage, or contaminated base metal. Make sure the gas flow rate is correct (typically 20–25 CFH for mild steel) and the metal surface is clean. Using a quality anti-spatter spray like Hobart 770086 Anti-Spatter Spray can also reduce cleanup time on production work. Tack pulls the joint out of alignment This happens when tacks are applied without an opposing tack to balance thermal contraction. Always place tacks in pairs or sequences that counteract pulling.Tack Welds on Thin Material
Thin material — 18 gauge and thinner — is where tack welds most often cause trouble. Heat accumulates quickly, and by the fourth or fifth tack, the base metal is hot enough that each subsequent tack risks burn-through. Let the metal cool between tacks. Touch the backside of the workpiece with your gloved hand between tacks — if it’s uncomfortable to hold, wait longer. Some fabricators use a heat sink or copper backer to pull heat away faster. Short contact time becomes even more important on thin material. Practice triggering for half a second or less while maintaining gun position. A quality entry-level welder like the Lincoln Electric Weld-Pak 140 set to its lower voltage taps handles thin material tack sequences well, giving enough control without excessive inductance that drives spatter. managing fit-up and heat when MIG welding sheet metal follows the same principles as careful tack placement — consistent spacing, minimal heat, and good joint prep.FAQ
How long should a MIG tack weld be? Typically 3/8″ to 1/2″ long for most structural and fabrication work. Tacks on thin sheet metal may be shorter — around 1/4″ — to minimize heat input. The tack needs to be long enough to provide meaningful holding strength but short enough to avoid introducing excess heat that distorts the joint. Should tack welds be ground before welding? In structural welding, yes — tack ends should be feathered to ensure the final weld fuses through without crater defects. For general fabrication, clean and properly fused tacks that will be fully consumed by the final pass don’t always require grinding. Always remove cracked or poorly fused tacks before welding over them. How many tacks do you need on a long joint? A common guideline is one tack every 4–6 inches on joints over 12 inches long, working from the center outward after securing both ends. On thinner material or joints prone to distortion, space tacks closer together — every 1–2 inches. The goal is to hold alignment without leaving sections free to move between tack points. Why do my tack welds crack? Cracking usually points to contamination (oil, rust, paint, or mill scale on the base metal), a too-rapid quench rate, or insufficient fusion leaving a cold lap that fails under thermal stress. On higher-carbon or alloy steels, hydrogen-induced cracking is also possible without preheat. Clean the base metal thoroughly and check material type before tacking. Can you do a tack weld without a fixture or clamp? Yes, but it requires careful hand positioning and quick work. In practice, even a simple C-clamp or a pair of locking pliers improves tack quality significantly by keeping the joint gap consistent while you weld. Holding two pieces freehand while triggering the gun often results in movement at the moment of the tack. What’s the difference between a tack weld and a stitch weld? A tack weld is a single, localized spot used to hold components in position before final welding. A stitch weld is a series of intermittent short weld segments that serve as the final weld — commonly used on thin panels to control heat. exhaust pipe repair often uses stitch welding rather than continuous passes for exactly this reason. Does tack weld position affect distortion? Significantly. Tacks placed only on one side of a long joint allow the opposite side to pull during thermal contraction. Strategic tack sequences — alternating sides, working from center outward — distribute heat input and counteract distortion. Skipping this step is one of the most common reasons fabricators end up with bowed or twisted assemblies.Tack welds are the foundation your final weld is built on. A clean, properly fused tack holds alignment, minimizes distortion, and incorporates smoothly into the finished joint. Getting the placement sequence, gun angle, and settings right takes only a small amount of practice but pays dividends on every project that follows.


