
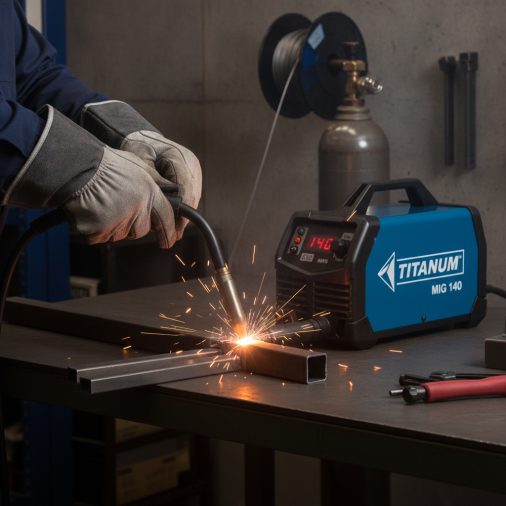
The Titanium MIG 140 is a popular entry-level to mid-range welder sold through Harbor Freight, and it punches well above its price point for home shops, hobbyists, and light fabrication work. But buying the machine is only half the battle. Knowing how to set it up correctly, dial in your wire speed and voltage, and run a clean bead is what separates frustrating results from solid welds. This guide walks you through everything — from unboxing and setup to running your first bead and troubleshooting common problems.
Quick Answer
To use the Titanium MIG 140, connect your gas supply (or install flux-core wire for gasless welding), load your wire spool, set voltage and wire speed based on your material thickness, clamp the ground to clean metal, and pull the trigger to strike an arc. Move the gun steadily along the joint at a consistent angle and travel speed.
What Comes in the Box and What You’ll Need

Before you strike your first arc, take stock of what the machine includes and what you’ll need to source separately.
Included with the Titanium MIG 140:
– MIG welding gun with liner
– Ground clamp and cable
– Gas hose fitting
– Spool of 0.030″ flux-core wire (in most packages)
– Contact tips (typically 0.030″ installed)
What you’ll likely need to buy separately:
– Shielding gas — typically 75% Argon / 25% CO₂ (C25) for mild steel MIG welding
– A gas regulator and hose if not included
– Solid MIG wire (0.023″ or 0.030″ depending on material thickness)
– Auto-darkening welding helmet (shade 9–11 for MIG)
– Welding gloves and jacket
– Wire brush and angle grinder for prep
The Titanium MIG 140 runs on standard 120V household current, which makes it convenient for home garages. It handles material from 24-gauge sheet metal up to approximately 3/16″ steel in a single pass.
Setting Up the Machine Step by Step

Getting the setup right before you weld saves a lot of frustration. Rushing this part is where most beginners go wrong.
Step 1 — Install the Wire Spool
1. Open the side panel of the welder.
2. Place the spool on the spool hub with the wire feeding off the bottom.
3. Secure the spool with the retaining nut — snug but not overtightened.
4. Release the drive roll tension arm and thread the wire through the inlet guide, over the drive roll groove, and into the gun liner.
5. Re-engage the tension arm. Set tension so the wire feeds smoothly without slipping or birdnesting — typically light pressure for 0.023″ wire, slightly more for 0.030″.
Step 2 — Select the Correct Drive Roll and Contact Tip
The Titanium MIG 140 uses a knurled drive roll for flux-core wire and a smooth V-groove roll for solid wire. Make sure the groove size matches your wire diameter. The contact tip must also match — 0.023″ tip for 0.023″ wire, 0.030″ for 0.030″ wire. A mismatched tip causes erratic feeding and arc instability.
Step 3 — Connect Your Gas Supply (For MIG Welding)
If you’re running solid wire with shielding gas:
1. Attach the regulator to your gas cylinder (C25 or 100% CO₂).
2. Connect the gas hose from the regulator to the inlet on the back of the welder.
3. Set flow rate to 15–20 CFH (cubic feet per hour) for most indoor welding situations.
4. Increase to 20–25 CFH if welding in a drafty area.
For flux-core welding, skip the gas entirely. Flux-core wire is self-shielding — the flux inside the wire creates its own shielding when burned.
Step 4 — Feed the Wire to the Gun Tip
Press the trigger (with the machine powered on) to feed wire through the liner until it extends about 3/8″ past the contact tip. Trim any excess. This stick-out length matters — too long and you’ll get spatter and a weak arc; too short and you risk burning back into the tip.
Voltage and Wire Speed Settings for Common Thicknesses
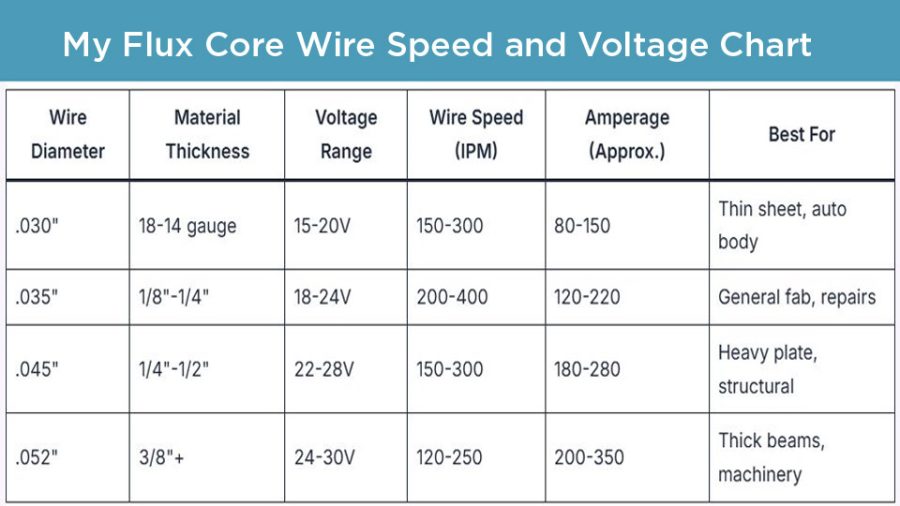
This is the section most beginners struggle with. The Titanium MIG 140 has a voltage selector (typically labeled A, B, C, D or similar stepped positions) and a continuous wire speed dial.
Use this reference table as a starting point. Always run a test bead on scrap before welding your actual workpiece.
| Material Thickness | Wire Diameter | Voltage Setting | Wire Speed (approx.) | Gas |
|---|---|---|---|---|
| 24 gauge (0.024″) | 0.023″ | A (lowest) | 2–3 | C25 |
| 18 gauge (0.048″) | 0.023″ | A–B | 3–4 | C25 |
| 1/16″ | 0.030″ | B | 4–5 | C25 |
| 1/8″ | 0.030″ | C | 5–6 | C25 or flux-core |
| 3/16″ | 0.035″ flux-core | D (highest) | 6–7 | None (flux-core) |
These are starting points. The right setting produces a steady, consistent crackling sound — often described as frying bacon. A sputtering, popping arc means wire speed is too high or voltage too low. A hissing, blowing arc usually means voltage is too high for the wire speed.
Running Your First Bead — Technique That Actually Works
Good technique makes the difference between a weld that holds and one that looks like a bird dropped it.
Prepare your metal first. Remove mill scale, rust, paint, and oil from the weld area. MIG welding is less forgiving of contamination than stick welding. A quick pass with a flap disc or wire brush goes a long way.
Clamp your ground close. Attach the ground clamp to clean, bare metal as close to the weld area as practical. A poor ground connection causes arc instability and spatter.
Gun angle and travel direction:
– Hold the gun at a 10–15° push angle (gun pointing in the direction of travel, tilted slightly away from the weld pool).
– For vertical welds, a slight drag angle works better.
– Keep a consistent 3/8″ to 1/2″ contact-tip-to-work distance.
Travel speed: Move steadily. If you move too slowly, you’ll pile up metal and risk burn-through on thinner material. Too fast and you’ll get a narrow, convex bead with poor fusion. Watch the weld pool, not the arc — the pool tells you what’s actually happening.
Weave or stringer: For most joints on the Titanium MIG 140’s power range, straight stringer beads work well. Small side-to-side weaves help fill wider gaps or cover wider joint areas.
Flux-Core vs. MIG Gas — When To Use Each
The Titanium MIG 140 handles both processes, and choosing the right one matters.
Use solid wire with C25 shielding gas when:
– Welding indoors where you can control the environment
– Working on thin sheet metal (auto body, brackets)
– You want cleaner welds with less spatter and no slag to chip
Use flux-core wire when:
– Welding outdoors or in windy conditions (shielding gas gets blown away)
– Working on thicker material in a single pass
– You don’t have a gas cylinder available
Flux-core produces more spatter and leaves a slag layer that must be chipped off. The welds are typically stronger on thicker material, but the cleanup is more involved.
Common Problems and How to Fix Them
Even experienced welders run into issues when dialing in a new machine. Here are the most frequent problems with the Titanium MIG 140 and their practical fixes.
Birdnesting (wire tangling at the drive roll):
– Cause: Too much drive roll tension, kinked liner, or blocked contact tip.
– Fix: Reduce tension, check the liner for kinks, replace the contact tip.
Porosity (holes or pits in the weld):
– Cause: Contaminated base metal, insufficient gas coverage, or a leak in the gas line.
– Fix: Clean the metal thoroughly, check all gas connections, increase flow rate slightly.
Burn-through on thin metal:
– Cause: Voltage too high or travel speed too slow.
– Fix: Drop one voltage setting, increase travel speed, or use 0.023″ wire.
Spatter everywhere:
– Cause: Wire speed too high relative to voltage, or flux-core wire with no anti-spatter spray.
– Fix: Reduce wire speed, recheck settings against the chart, apply anti-spatter spray to the nozzle.
Wire stubbing into the workpiece:
– Cause: Wire speed too high or voltage too low.
– Fix: Increase voltage or reduce wire speed until the arc sounds smooth and consistent.
FAQ
What wire size should I use with the Titanium MIG 140?
For most home shop work on mild steel, 0.030″ solid wire with C25 gas is the most versatile choice. Use 0.023″ for thin sheet metal under 1/16″ to reduce burn-through risk. For flux-core welding without gas, 0.030″ or 0.035″ flux-core wire works well on material 1/8″ and thicker.
Can the Titanium MIG 140 weld aluminum?
Not practically in its standard configuration. Aluminum requires a spool gun or push-pull system to feed the soft wire without birdnesting, plus 100% Argon shielding gas. The Titanium MIG 140 does not natively support a spool gun, so aluminum welding is outside its practical capability for most users.
What shielding gas works best with the Titanium MIG 140?
C25 (75% Argon / 25% CO₂) is the standard choice for mild steel and gives a good balance of arc stability, penetration, and spatter control. Pure CO₂ is cheaper and increases penetration but produces more spatter. For stainless steel, a tri-mix gas (Helium/Argon/CO₂) is typically used, though the Titanium MIG 140 is not optimized for stainless work.
Why does my weld look like a stack of fish scales instead of a flat bead?
This usually means wire speed is too high relative to voltage, or travel speed is inconsistent. The weld pool is piling up rather than flowing flat. Try increasing voltage one step, slowing wire speed slightly, and maintaining a more consistent travel pace. Running a test bead on scrap while adjusting one variable at a time is the fastest way to dial it in.
How thick of metal can the Titanium MIG 140 actually weld?
The machine is rated for up to 3/16″ mild steel in a single pass. In practice, 1/8″ welds cleanly and consistently. At 3/16″, you’ll want to run the machine at maximum settings and may need multiple passes for full penetration on structural joints. Beyond 1/4″, a higher-amperage machine is a better tool for the job.
Do I need to change the polarity for flux-core wire?
Yes. Flux-core wire typically requires DCEN (Direct Current Electrode Negative), also called straight polarity. Solid MIG wire uses DCEP (Direct Current Electrode Positive), or reverse polarity. The Titanium MIG 140 has polarity connections inside the wire compartment — swap the gun and ground leads when switching between processes. Running flux-core on the wrong polarity causes poor arc quality and weak welds.
What’s the best way to weld thin auto body sheet metal with this machine?
Use 0.023″ solid wire, C25 gas, and the lowest voltage setting. Tack weld in short bursts rather than running continuous beads to control heat input and prevent warping. Allow the metal to cool between tacks. A stitch welding pattern — short welds spaced apart and filled in gradually — works far better than trying to run a full bead on thin panels.
Final Thoughts
The Titanium MIG 140 is a capable machine when set up correctly and used within its limits. Most problems — spatter, porosity, burn-through — trace back to incorrect settings or poor metal prep rather than machine defects. Spend time on scrap metal dialing in your voltage and wire speed before moving to your actual project. Clean metal, a solid ground connection, and consistent gun technique will get you clean, strong welds every time.
Meta Description: Learn how to set up and use the Titanium MIG 140 welder — from wire installation and gas setup to settings, technique, and troubleshooting common problems.


