
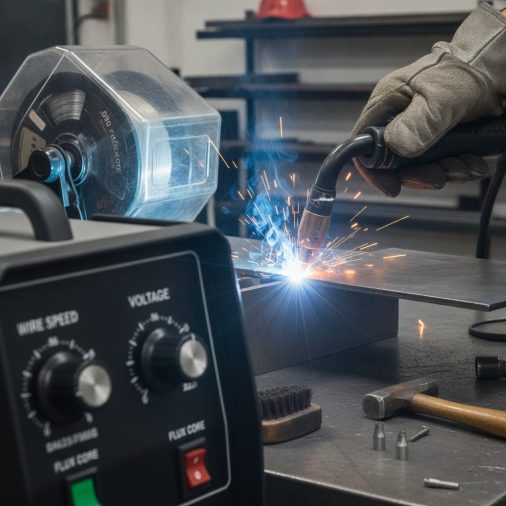
Setting up a MIG welder to run .030 flux core wire on quarter-inch steel is one of those situations where the wrong heat setting leads to cold laps, poor fusion, or a weld that looks decent on top but hasn’t fully penetrated the joint.
For .030 flux core wire on 1/4-inch mild steel, most machines will need to run near their upper heat range — typically voltage settings in the range of 18–21 volts with wire feed speeds roughly between 200–280 inches per minute, depending on your machine, joint type, and position. These are starting points only. Check your welder’s built-in settings chart first, since manufacturer guidance accounts for your specific machine’s output characteristics.
Why Heat Settings Matter More Than You Might Expect
Quarter-inch steel is at the upper limit for most 120V flux core setups and well within range for 220V machines. The core issue is fusion — you need enough heat to fully melt the base metal, not just the wire.
Insufficient heat on 1/4-inch plate produces a weld bead that sits on top of the steel instead of merging with it. That’s called a cold lap or lack of fusion, and it’s a genuine structural problem even if the bead looks clean on the surface.
Polarity for Flux Core Wire
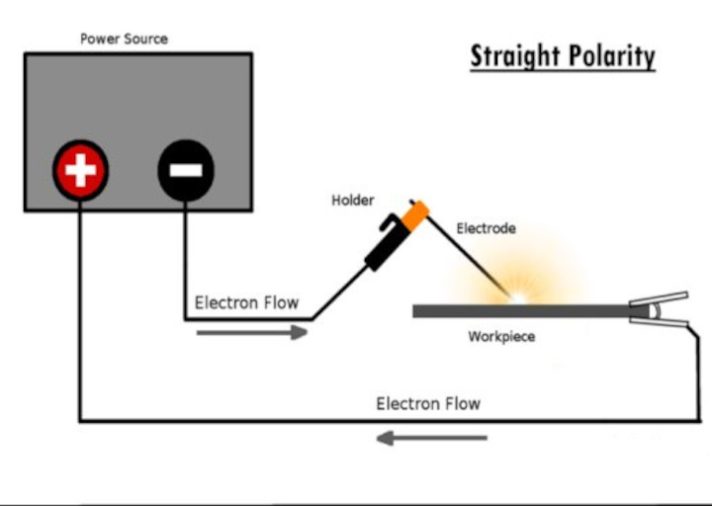
This step trips up a lot of welders. Self-shielded flux core wire — the type used without a gas cylinder — runs on DCEN (Direct Current Electrode Negative), also called straight polarity. This is the opposite of standard solid wire MIG welding.
If your machine is still set to DCEP (electrode positive) from a previous solid-wire session, your arc will be erratic, spatter will be excessive, and penetration will suffer. Swap your torch and work leads at the machine terminals before running flux core. You can read more about this in a detailed breakdown of MIG welding polarity and how to set it correctly.
120V vs. 220V Machines: A Critical Distinction
The voltage your welder runs on has a direct impact on whether it can handle 1/4-inch steel at all.
120V machines — most entry-level and portable units — are generally rated for a maximum of around 3/16 inch on flux core. Attempting 1/4-inch stock often results in marginal penetration even at full power. You may get an acceptable single-pass bead on a flat lap joint, but butt joints and fillets in vertical or overhead positions become much harder to fully fuse.
220V machines handle 1/4-inch steel comfortably and give you meaningful voltage adjustment room. A machine like the Lincoln Electric Weld-Pak 180 HD or a comparable 180–210 amp class welder operating on 220V will produce reliable penetration at appropriate settings.
If you’re running a 120V machine on 1/4-inch steel, consider making multiple passes, beveling the joint edges, or switching to a 220V machine for this application.
Practical Starting Settings by Machine Class

The table below provides general starting-point guidance. Always verify against the chart inside your machine’s door or lid, and run test beads on scrap of the same thickness before welding your actual joint.
| Machine Class | Voltage Range (Starting Point) | Wire Feed Speed (Starting Point) | Notes |
|---|---|---|---|
| 120V (90–140A) | Max or near-max setting | 220–260 IPM | May struggle on full 1/4-inch; bevel joint edges |
| 220V (140–180A) | 18–20V | 210–260 IPM | Good single-pass capability on flat position |
| 220V (180–210A) | 19–21V | 240–280 IPM | Reliable on flat and horizontal fillet welds |
These figures apply to self-shielded .030 flux core wire on mild steel in flat or horizontal position. Vertical and overhead welding generally requires reducing heat slightly to control the puddle.
How to Dial In Your Settings on Scrap
Never go straight to your project piece. Running test beads on offcuts of the same 1/4-inch steel takes a few minutes and saves a ruined workpiece.
Start at the lower end of your machine’s recommended range and run a short bead. Look at the bead profile and listen to the arc. A properly set flux core arc on steel produces a steady, consistent crackling sound — not loud popping or random sputtering.
Cut or grind through a test bead cross-section when possible. Full penetration on a butt joint means the weld has melted through and produced a slight reinforcement on the back side. A fillet weld should show equal fusion into both pieces of the joint.
For a broader look at how flux core settings scale across different thicknesses, a flux core MIG welding settings reference chart can be a useful companion to your machine’s built-in guide.
Joint Preparation for 1/4-Inch Stock
Heat setting alone won’t compensate for poor joint fit-up or contaminated base metal.
Remove mill scale, rust, paint, oil, and any coating from the weld zone. Flux core wire is more tolerant of surface contamination than solid wire MIG, but cleaner metal still produces better fusion and fewer porosity issues.
For butt joints on 1/4-inch plate, consider a slight bevel — around 30–37.5 degrees on each piece — to help the arc reach the root of the joint. Tight fit-up with minimal root gap works best for single-pass welds at this thickness.
Reading Your Bead: What Good and Bad Looks Like
Your bead tells you a lot about whether the settings are close.
- Signs the heat is too low:
- Bead is tall, narrow, and rounded on top
- Bead sits above the base metal instead of blending in
- Incomplete fusion at the toes of the weld
- Wire may stub or push back against the puddle
- Signs the heat is too high:
- Excessive spatter
- Bead is wide, flat, and may undercut the edges
- Burn-through on thinner areas or edges
- Loss of puddle control in vertical or overhead position
- Signs the settings are close:
- Bead has a consistent profile with smooth toes that blend into the base metal
- Slag lifts cleanly after cooling
- Arc sounds steady throughout the run
Wire Speed and Voltage Work Together
It’s a common mistake to adjust only one variable at a time. Voltage and wire feed speed interact directly — voltage controls arc length and heat input, while wire speed controls how fast the electrode is consumed and affects amperage.
If you increase voltage without raising wire speed, the arc can become too long and erratic. If you raise wire speed without enough voltage, the wire stubs into the puddle. Small adjustments to both together will get you dialed in faster than chasing one setting at a time.
If your machine uses a single heat knob rather than separate voltage and wire feed controls, follow the manufacturer’s chart precisely for the wire diameter and material thickness — those knobs are calibrated to adjust both parameters simultaneously.
Flux Core Without Gas: What That Means for Your Setup
Self-shielded flux core wire generates its own shielding from compounds inside the wire. There is no external shielding gas cylinder involved. This makes it practical for outdoor use and windy conditions where gas-shielded processes struggle.
The tradeoff is more post-weld slag and typically more spatter compared to solid wire with gas. Always chip and wire-brush the slag off each pass before adding another bead. Welding over unremoved slag traps inclusions in the weld. For a fuller explanation of how this process works, see how gasless MIG welding with flux core operates.
Safety When Running Flux Core on Heavy Steel
Flux core wire produces more fume than solid wire MIG. Weld in a well-ventilated area or use local exhaust ventilation positioned close to the arc. Never weld in a confined space without forced-air ventilation and appropriate respiratory protection.
Use a helmet rated for MIG and flux core welding — a minimum shade 10 lens, though many welders prefer shade 11 for this process at higher amperages. Wear leather gloves, a flame-resistant jacket or sleeves, and keep flammable materials clear of the work area. Quarter-inch steel retains heat for a significant time after welding — mark hot parts and allow adequate cooling before handling.
Frequently Asked Questions
Can a 120V flux core welder handle 1/4-inch steel?
Most 120V flux core welders are rated to a practical maximum of around 3/16 inch. On 1/4-inch steel, you may achieve an acceptable bead on a flat lap joint at full power, but full penetration on butt joints or welds in vertical position is difficult. Beveling joint edges and making multiple passes can help, but a 220V machine is the more reliable choice for consistent results at this thickness.
What wire feed speed should I use for .030 flux core on 1/4-inch steel?
Wire feed speed depends on your machine’s output and the voltage setting you’re running. As a general starting range, settings between roughly 200 and 280 inches per minute are commonly used for .030 flux core on 1/4-inch mild steel on 220V machines. Always start from your machine’s built-in chart and adjust based on bead appearance and arc sound.
Do I need to change polarity when switching from solid wire to flux core?
Yes. Self-shielded flux core wire requires DCEN (electrode negative / straight polarity). Standard solid wire MIG runs on DCEP (electrode positive / reverse polarity). Failing to swap polarity when changing wire types causes poor arc stability, excessive spatter, and shallow penetration.
Why is my flux core bead sitting on top of the metal instead of fusing in?
A bead that sits proud of the surface without fusing into the base metal is a classic sign of insufficient heat or excessive travel speed. On 1/4-inch steel, increase voltage and wire feed speed incrementally, slow your travel speed slightly, and maintain a consistent work angle. Also verify that polarity is set correctly for flux core wire.
How many passes does .030 flux core wire need on 1/4-inch steel?
A single pass is often sufficient on a properly prepared flat butt or fillet joint using a 220V machine at appropriate settings. For full penetration on a butt joint without a bevel, or when welding in a position other than flat, a root pass followed by a cover pass may produce better results. Always remove slag completely between passes.
Is .030 flux core wire a good choice for 1/4-inch steel, or should I use .035?
Both diameters are used on 1/4-inch steel. A .035 wire carries more metal per inch of feed, which can improve productivity and penetration on heavier material when the machine has enough output to support it. On machines near the upper end of their capacity, .030 wire is a reasonable choice. If your machine supports .035 and the manufacturer chart recommends it for this thickness, it may produce a more efficient weld.
Getting the Most Out of Your Settings
Quarter-inch steel sits at or near the upper limit of many smaller flux core setups, so machine capacity matters as much as the settings themselves. Start from your machine’s recommended chart for .030 wire at 1/4 inch, verify polarity is set to DCEN, and run several test beads before committing to your actual joint.
Listen to the arc, read the bead profile, and make small paired adjustments to voltage and wire speed together. Clean base metal, good joint fit-up, and proper travel speed will do as much for weld quality as heat setting alone.


