
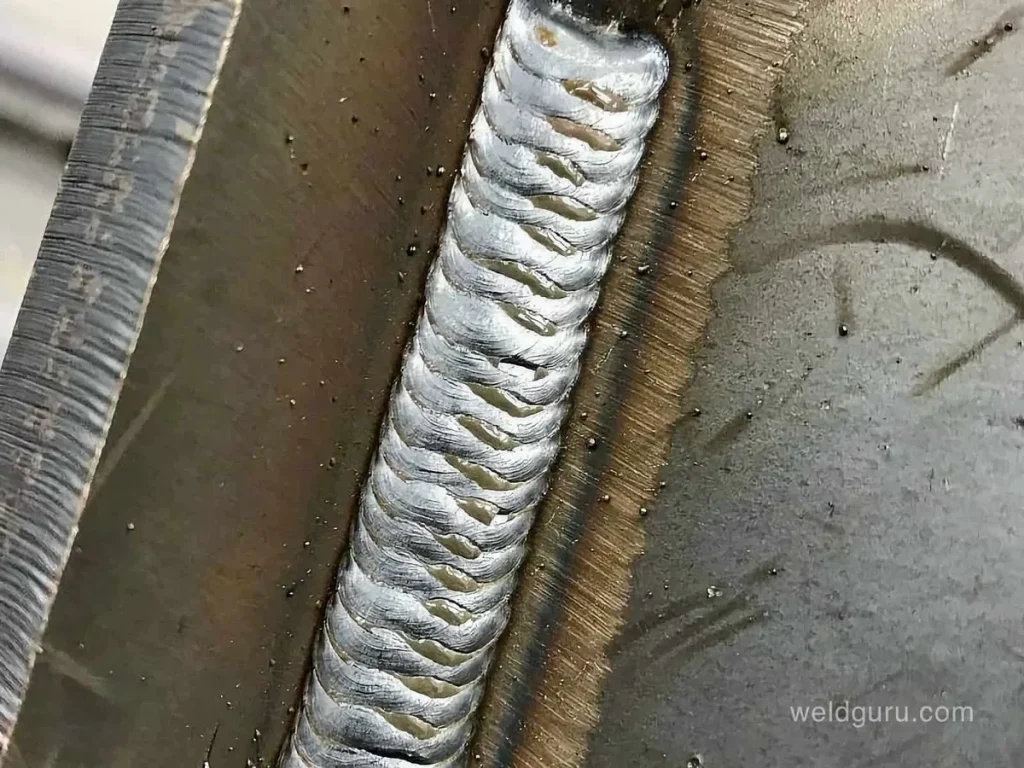
Mastering how to weld vertical MIG starts with understanding that gravity is your biggest opponent. Unlike flat or horizontal welding, where the molten puddle sits predictably, vertical joints demand constant attention to prevent drips and ensure proper fusion. It's a skill that separates intermediate welders from the pros, requiring a feel for the metal and a sharp eye.
The American Welding Society (AWS) has standards for weld quality, and achieving them on a vertical joint with Metal Inert Gas (MIG) welding means controlling that molten puddle precisely. Manufacturer specifications for shielding gas flow rates, often around 20-30 cubic feet per hour (CFH) for common setups, are critical, but they're just the starting point. We'll show you how to read what the weld is telling you.
Why Seeing is Believing: Mastering Vertical MIG Welding with Visuals
Sometimes, reading about welding isn't enough. Vertical MIG welding, arguably one of the trickiest positions to master, is a prime example. Text can describe torch angle, travel speed, and puddle manipulation, but it’s hard to truly grasp without seeing it. Visual cues, the shape of the molten puddle, the way the arc sounds, the appearance of the finished bead, are what experienced welders rely on daily.
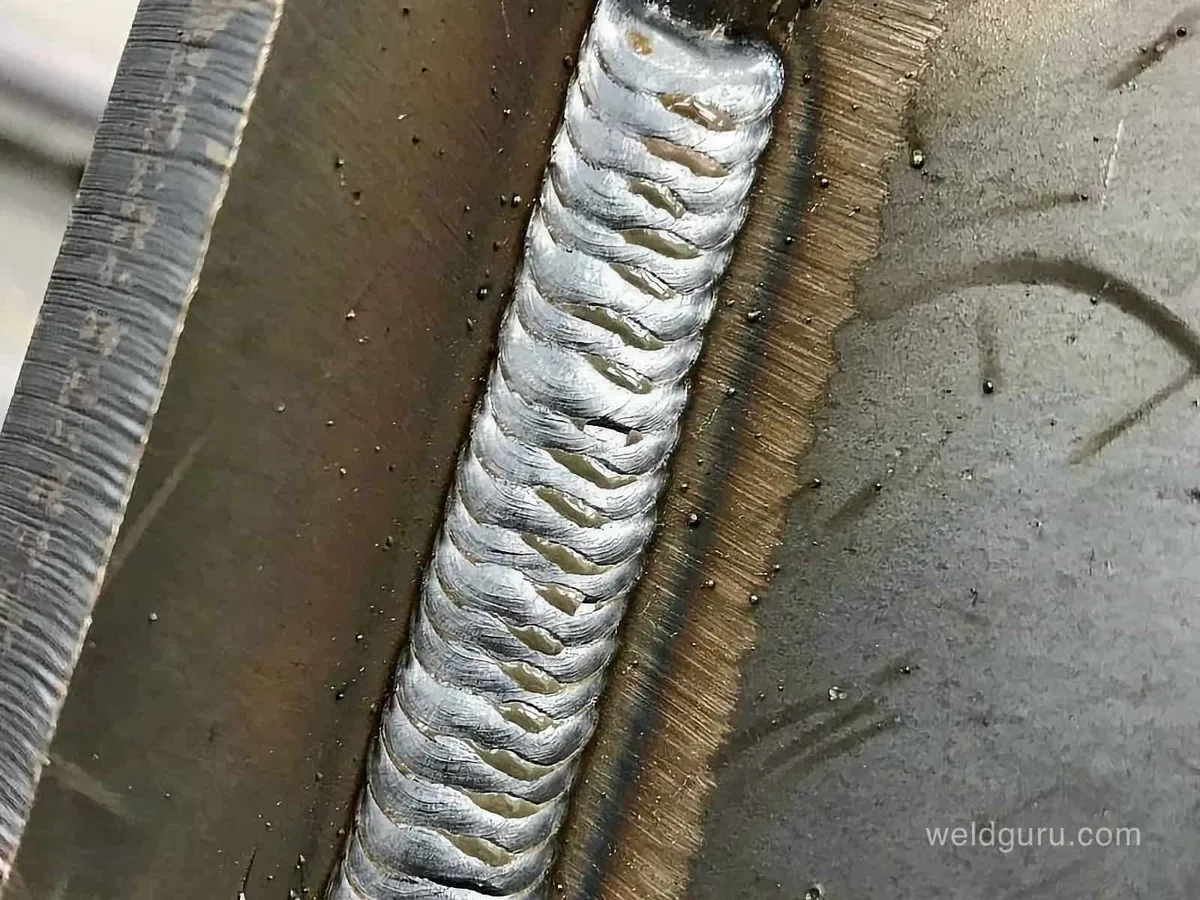
Image source: Bing (Web (fair-use with source credit))
This guide breaks down the visual language of vertical MIG welding. We’ll walk through what to look for, what common mistakes look like, and how to align your technique to achieve strong, clean welds. Pay attention to the details; they're how you'll tell a good weld from a bad one, especially when gravity’s making things challenging.
Quick Insight: The Vertical MIG Weld Bead's Story
A well-executed vertical MIG weld bead tells a story of controlled heat and precise movement. It should be uniform, exhibiting good fusion with the base metal and consistent width, usually with slight toe rises that blend smoothly into the parent material. There are no significant dips, humps, or undercut. The bead might be slightly convex or flat, depending on the technique and progression (upward or downward).
Core Mechanics: How Gravity and Heat Paint Your Weld
Vertical MIG welding is a delicate balancing act between applying enough heat to fuse your filler material to the base metal and moving quickly enough to prevent the molten puddle from sagging or dripping. It’s all about managing that pool of molten metal as it tries to obey gravity. Understanding the interplay of heat and your movement is paramount for success.
The Puddle: Your Glimpse into the Weld's Soul
The weld puddle is your most critical visual indicator. When MIG welding vertically, you're looking for a puddle that’s not too large or fluid, yet not so small that it won’t wet out properly. It should have a distinct shape, often described as peanut-shaped or slightly egg-shaped when viewed from top-down. The leading edge should point slightly ahead in your direction of travel, and the sides should be well-defined but starting to wet into the base metal.
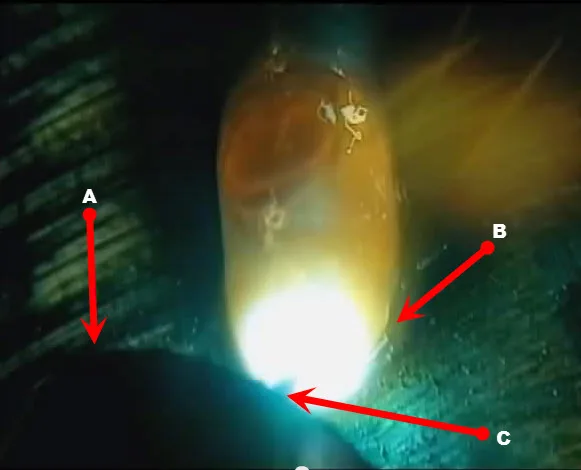
Image source: Bing (Web (fair-use with source credit))
If the puddle is too fluid, it will sag or run ahead of your torch, potentially leading to undercut or a lack of fusion. If it’s too stiff, you might not get enough penetration. The amount of convexity or concavity in the puddle, and how quickly it solidifies after you move, all provide clues about your welding parameters. Pay close attention to how the puddle reacts to your slight pauses or faster movements.
Torch Angle & Stick-Out: Precision's Subtle Dance
Your torch angle and the amount of welding wire extending beyond the contact tip (stick-out) are incredibly important for vertical MIG. For upward progression, you generally want to pull the torch slightly, aiming it upwards at perhaps a 5 to 15-degree angle relative to the base metal. This helps push the puddle back slightly and encourages it to wet into the joint.
The stick-out, the distance from the contact tip to the end of the weld puddle, typically needs to be consistent, often around 1/4 inch to 1/2 inch for common MIG welding scenarios. Too long a stick-out can lead to poor gas shielding, causing porosity, and reduced control over the puddle. Too short can overheat the contact tip and prevent proper arc length. For vertical welding, maintaining a tight, controlled stick-out is key to managing the puddle’s fluidity.
Travel Speed: The Rhythm of Solidification
Travel speed is the rate at which you move your welding torch along the joint. In vertical MIG welding, finding the right speed is critical. If you move too slowly, the puddle will grow too large, sag, and potentially cause porosity or burn-through. If you move too quickly, you won't get adequate fusion with the base metal, or you’ll create a narrow bead with poor penetration.
You're aiming for a speed that allows the molten metal to solidify just enough to support itself as you move on. This often means a consistent, steady pace, but it might require slight pauses at the edges of your weave to ensure proper tie-in. The visual appearance of the puddle, how fast it reforms after a slight pause, will tell you if your speed is correct. If you’re seeing drips or significant sag, you're likely moving too slow or have your voltage too high.
Get Set Up Right: Tools and Parameters for Success
Before you even think about striking an arc, getting your equipment dialed in for vertical MIG welding is non-negotiable. This means selecting the right welding machine, ensuring your shielding gas is appropriate, and setting your wire feed speed and voltage correctly. These aren't just minor details; they lay the foundation for your weld quality.
Your MIG Machine and Gas Guide
For vertical MIG, you'll want a MIG welder capable of producing stable arc characteristics. Many modern machines offer adjustable inductance, which can help control the weld puddle's fluidity, making vertical welding easier. The type of shielding gas is also crucial. For steel, a common choice is a mix of 75% Argon and 25% CO2.
However, for vertical up welding, especially on thicker materials, using straight CO2 or a gas blend with a higher CO2 content can sometimes provide a stiffer arc and better puddle control, though it may increase spatter.
Always check your gas regulator is functioning correctly and set to the recommended flow rate, as specified by the welding wire manufacturer or by industry standards, typically between 20-30 CFH for mild steel. Using the correct regulator ensures consistent gas shielding, which is vital to prevent weld defects like porosity. Getting this right is a fundamental step before you even strike an arc. Best Gas Regulator For Home can help you understand selection.
Wire Speed and Voltage: Finding the Sweet Spot
Setting the correct wire feed speed and voltage is where practice really pays off. These two parameters are interconnected and dictate how much heat goes into your weld. Manufacturer charts, like those found on wire spools or in machine manuals, offer starting points. For example, welding 1/4-inch mild steel vertically might suggest a wire speed of around 175-225 inches per minute (IPM) and a voltage somewhere in the 18-22 volt range, depending on the wire diameter and specific machine.
However, these are just guidelines. Your actual settings will depend on the exact material thickness, the type of steel, the wire diameter, and even the environmental conditions. A common approach for vertical MIG is to run slightly cooler than you might for flat welding. This means you might adjust your voltage down or your wire feed speed up to manage the puddle better.
If you're new to this, consulting a Welding Chart Mig Wire can provide a good baseline, and fine-tuning using your machine’s settings is essential. You can learn more about these interactions in articles covering Mig Welder Settings.
The Step-by-Step Vertical MIG Technique: A Visual Walkthrough
Achieving a quality vertical MIG weld isn't about brute force; it's about finesse and constant adjustment. Whether you’re welding upward or downward, the core principles of control and visual feedback remain the same. This breakdown will help you visualize the process.
Preparation: Clean Metal is Key
Before you even pick up your welding gun, ensure the metal is clean. Contaminants like rust, paint, oil, or mill scale will cause weld defects such as porosity and lack of fusion. For steel, using a wire brush or grinder can prepare the surface. For critical applications, beveling the joint edges might be necessary to ensure full penetration, especially on thicker materials.
Starting the Arc: A Controlled Kiss
When you initiate the arc, do so with a quick, decisive motion. For short-circuit transfer, often the mode used for vertical welding, you'll typically get a 'crackling' sound. Aim to establish a small, controlled puddle right away. You want enough heat to wet into both pieces of metal you're joining.
Avoid making contact with the base metal with the wire before pulling the trigger, this can cause issues with arc initiation and the first bit of your weld.
The Vertical Weave: Mastering the Puddle's Flow
This is where the visual aspect becomes paramount. How you weave the torch dictates the bead shape, penetration, and fusion.
Upward Progression: Building Stronger Layers
Welding vertically upwards (vertical-up) is generally preferred for creating stronger, more robust welds because gravity assists in holding the molten metal against the joint. You'll typically use a series of short-arc pulses, moving the torch in a subtle weave pattern. Think of a tight, controlled zig-zag or a slight C-shape motion.
The key is to pause briefly at each side of the joint to ensure good tie-in, then move across the center. You're essentially building up the weld layer by layer. The puddle should remain relatively small and manageable throughout the process. If you see it sagging, you’re likely moving too slow or have too much heat.
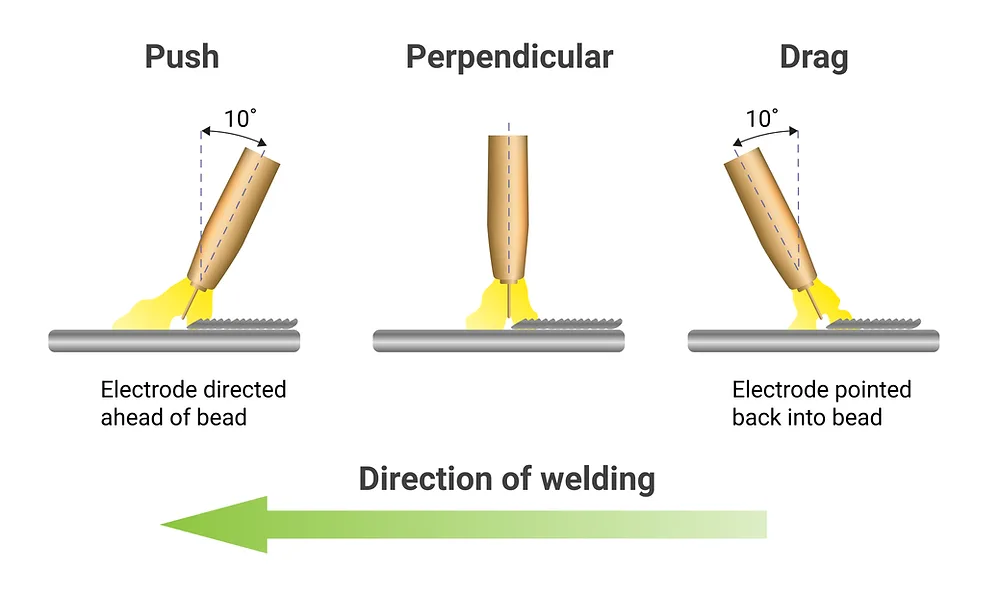
Image source: Bing (Web (fair-use with source credit))
Downward Progression: Speed Meets Control
Welding vertically downwards (vertical-down) is faster but typically results in shallower penetration and a weaker weld. It's often used for thinner materials or when speed is a priority and weld strength is less critical. The motion here is more of a rapid stringer bead, moving quickly down the joint. You'll want to maintain a slightly tighter arc and potentially a higher travel speed than vertical-up.
The goal is to get the metal deposited quickly before gravity can pull it away. This method requires excellent control over your wire feed speed and voltage to prevent drips and ensure some degree of fusion.
Filling and Finishing: Completing the Joint
For thicker materials requiring multiple passes, the technique for subsequent passes is similar to the first, but you’ll be building on top of existing weld metal. Ensure you overlap each bead slightly to achieve full fusion between passes. Your final pass should aim for a smooth, uniform bead that fully ties into the base metal at the toes of the weld. Again, watch the puddle closely; it’s your best indicator of successful fusion and proper heat input all the way to the edges.
How to Measure a Fillet Weld Size can be helpful for final inspection.
Spotting Trouble: Common Visual Pitfalls and How to Fix Them
Even with the best intentions, sometimes things don’t go as planned. Recognizing common weld defects by their visual appearance is a crucial skill for any vertical MIG welder. Catching these early can save you a lot of rework and ensure the integrity of your join.
Undercut: The Hollowed-Out Lean
Undercut appears as a groove or indentation along the toe of the weld, where the base metal has been eroded away. It significantly reduces the effective cross-sectional area of the joint, thus weakening it. Visually, it looks like a small trench or ditch where the weld bead meets the parent material.
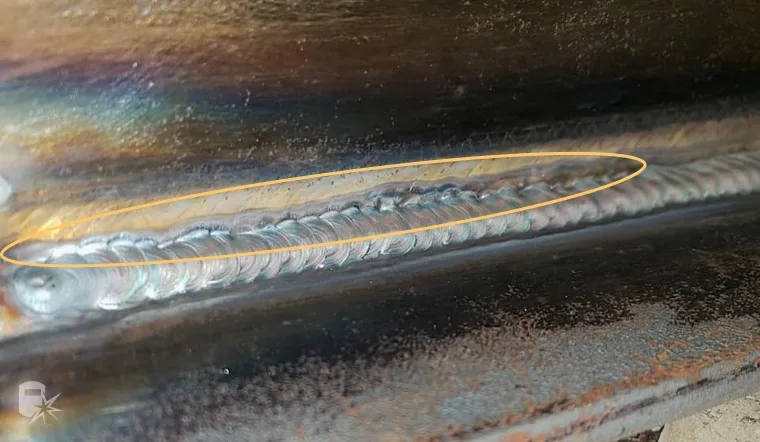
Image source: Bing (Web (fair-use with source credit))
The most common causes of undercut in vertical MIG welding are excessive amperage, travel speed that is too slow, or an incorrect torch angle that directs too much heat directly at the edge of the joint, melting it away. To fix it, try reducing your voltage or wire feed speed, or improve your torch angle to push the puddle rather than concentrate heat on the toe.
Lack of Fusion: The Boundary Not Met
Lack of fusion means the molten weld metal didn’t properly join with the base metal or the previous weld bead. Visually, you might see a distinct line where the weld bead sits on top of the base metal without merging into it, or you might see unfused material trapped between weld passes. It often looks like a crevice where the weld doesn't fully "wet out" onto the parent metal.
This defect is typically caused by insufficient heat, too fast a travel speed, or poor joint preparation. For vertical welding, a puddle that’s too small or doesn’t wet out properly is a strong indicator. Ensure you’re using enough heat by slightly increasing voltage or wire feed speed, and that your torch angle is encouraging the molten metal to spread and fuse. If you're welding multiple passes, make sure you're cleaning between them and overlapping adequately.
Drips and Sags: When Gravity Wins the Battle
These are probably the most visually obvious problems in vertical welding. Drips are blobs of molten metal that fall from the weld pool, while sags are elongated runs of metal that hang below the intended weld line. They indicate poor puddle control and that gravity has overcome the surface tension and solidifying forces of the weld metal.
This usually happens when the travel speed is too slow, the voltage is too high, or the shielding gas isn't providing enough "stiffness" to the arc to counteract gravity’s pull. If you’re seeing this, slow down your weave, reduce your heat input (lower voltage or increase wire feed speed), and ensure your torch angle is pushing the puddle slightly. For lower thickness materials, switching to a faster travel speed with a stringer bead might be necessary.
Porosity: Tiny Holes, Big Problems
Porosity looks like small, scattered holes on the surface of your weld bead, or worse, trapped within the weld. These are gas pockets that got trapped as the metal solidified. While small, scattered porosity might not always compromise the weld’s structural integrity, larger or concentrated porosity can be a serious weakness.
The primary culprit is usually inadequate shielding gas coverage. This can happen due to drafts, incorrect gas flow rate, too long a stick-out, or a contaminated shielding gas supply. Make sure your gas flow is set correctly (check parameters like flow rate per your Best Gas Regulator For Home guide), eliminate drafts, and maintain a consistent, appropriate stick-out. Cleaning the base metal thoroughly also prevents contaminants from being introduced into the weld pool.
Pro Tips for a Flawless Vertical Bead
Beyond the fundamental techniques, a few pro tips can significantly elevate your vertical MIG welding. Many experienced welders develop an almost intuitive feel for the process, which comes from consistent practice and paying attention to subtle cues. One often-overlooked aspect is the sound of the arc. A stable, consistent arc will have a harsh crackling sound.
If it sounds fizzy, sputtering, or erratic, it often indicates a problem with your parameters or shielding gas.
Listening to the arc is just as important as watching the puddle. A smooth, crisp sound usually means good heat transfer and stable puddle formation. If you hear inconsistent pops or roughness, it might signal that your voltage is slightly off, your travel speed is too fast, or you have a contamination issue affecting your shielding gas. Experimenting in a controlled environment, like a welding shop, can help you distinguish these sounds.
- Listen to the arc: A steady, crackling sound signifies a healthy arc.
- Adjust for sound: If the arc sounds rough, check your voltage, wire speed, and gas flow.
- Feel the heat: Beyond visuals, try to sense the heat radiating from the weld. Too little heat, and you’ll get lack of fusion; too much, and you risk burn-through and excessive sag.
Adjusting your torch angle and stick-out slightly can dramatically influence the puddle's behavior. For instance, a very slight downward angle on your torch, even while welding upward, can sometimes help push the puddle back and create a more controlled bead. This is a fine-tuning adjustment that comes with experience and feel.
Safety First: Welding Vertically Without Incident
Vertical MIG welding, like any welding operation, carries inherent risks that demand respect and adherence to safety protocols. Because you're often in positions where sparks and molten metal can fall, an extra layer of caution is warranted. Always wear appropriate personal protective equipment (PPE). This includes a properly fitting auto-darkening welding helmet with the correct shade lens, flame-resistant clothing (long sleeves and pants), leather welding gloves, and sturdy footwear.
Ensure you have good ventilation, especially when welding indoors or in confined spaces. The fumes generated by welding can be harmful. Always have a fire extinguisher rated for Class C fires (electrical) readily accessible, and clear the work area of any flammable materials within a 35-foot radius. If you’re welding in an area where this isn't possible, ensure hot work permits are obtained and appropriate fire watch procedures are in place.
- PPE is non-negotiable: Helmet, gloves, flame-resistant clothing, safety glasses.
- Ventilation matters: Work in a well-ventilated area or use fume extraction.
- Fire prevention: Keep flammables clear, and have an extinguisher handy.
Remember that welding can create significant noise and light exposure. Always protect your eyes and ears. For long welding sessions, consider the strain on your body, particularly when working in awkward vertical positions.
Vertically Welding Where You Need It: Key Applications
The ability to weld vertically is fundamental across many industries and fabrication projects. Structural steel fabrication is a massive area where vertical joints are commonplace, from building columns to bridge components. Pipeline welding, particularly for vertical ties or repair sections, relies heavily on this skill.
Fabricators building heavy equipment, like earthmovers or construction machinery, frequently encounter vertical seams that need strong, reliable welds. In the automotive sector, repairing chassis components or frames might require vertical welding. Even for more general fabrication projects, such as creating sturdy metal staircases, railings, or large custom brackets, mastering vertical MIG welding expands your capabilities significantly. It opens doors to joining materials in nearly any orientation required by a project's design.
- Construction: Structural beams, columns, reinforcing steel.
- Manufacturing: Heavy machinery, custom metalwork, industrial equipment.
- Repair: Automotive frames, agricultural equipment, pipeline maintenance.
The versatility of MIG welding, combined with the technique for vertical joints, makes it a highly practical skill for a wide range of applications where strong, attractive welds are needed in challenging positions. If you're looking to expand your fabrication repertoire, mastering this position is a solid investment.
When to Consider Other Methods: Alternatives to Vertical MIG
While vertical MIG welding is highly versatile, it's not always the absolute best choice for every situation. Sometimes, other welding processes offer distinct advantages for vertical joints. Shielded Metal Arc Welding (SMAW), commonly known as stick welding, is a traditional choice for vertical work, particularly on heavier materials and in out-of-position welding due to its robustness and ability to handle contaminants. For instance, vertical uphill stick welding using 7018 electrodes is a staple in structural steel and pipeline work.
Gas Tungsten Arc Welding (GTAW), or TIG welding, can also be used for vertical joints, especially on thinner materials or when an exceptionally clean, precise, and aesthetically pleasing weld is required. However, TIG demands a higher level of skill for out-of-position work. Flux-Cored Arc Welding (FCAW) is another strong contender for vertical applications, often offering deeper penetration than MIG and better performance in windy conditions. Some FCAW wires are specifically designed for all-position use.
Comparing the processes for vertical work:
- Vertical MIG: Good for production speed, ease of learning basics, decent penetration. Can be challenging with puddle control in vertical positions without specific techniques or machine features.
- Vertical SMAW (Stick): Excellent for structural strength, good in windy conditions, handles dirty metal better. Requires more practice to master puddle control, especially with uphill weaves.
- Vertical TIG: Highest quality, precise welds, but slowest and most difficult for out-of-position work. Best for thin materials or critical joints where aesthetics and purity are paramount.
- Vertical FCAW: Offers deep penetration, often better in windy conditions than MIG, and suitable for heavier materials. Can produce more spatter than MIG and requires slag removal.
Choosing the right process often depends on the material thickness, the required weld strength, the welding environment, and your own skill level. For general fabrication needs where speed and ease are factors, vertical MIG is a solid choice, but it's wise to know when SMAW or FCAW might be a better fit.


