
So, you're curious if picking up MIG welding is going to be a huge, frustrating battle. Honestly, like a lot of skills worth learning, the answer is a bit of a "yes and no." It’s not rocket science, but it’s also not as simple as pushing a button and getting perfect welds every time right out of the gate.
Think of it like learning to drive; most folks can get the hang of it with some practice, but becoming a really smooth, skilled driver takes time and experience. In our research, we've found that while MIG welding is generally considered the most accessible welding method for beginners, the perceived difficulty hinges heavily on your goals and patience.
The Quick Answer: Approachable, But Not Automatic
MIG welding isn't inherently "hard" in the way that some advanced crafts are, but it's definitely not something you master in an afternoon. The machine handles a lot of the complicated parts for you, which is a big plus for newcomers. However, achieving quality, structural welds that hold up under stress requires more than just pointing the gun and pulling the trigger.
Manufacturer specifications for entry-level MIG welders often highlight user-friendly interfaces, suggesting an immediate ease of use. Yet, as of 2026, the path to true welding proficiency involves understanding how your settings interact with different metals and joint types. Expecting perfection without practice is the fastest route to frustration.
Why MIG Welding Seems Easier at First
There are solid reasons why people often suggest MIG welding for those just starting out. It's user-friendly for a reason, making it a popular choice for hobbyists and entry-level fabrication.
The Basic Machine & Process
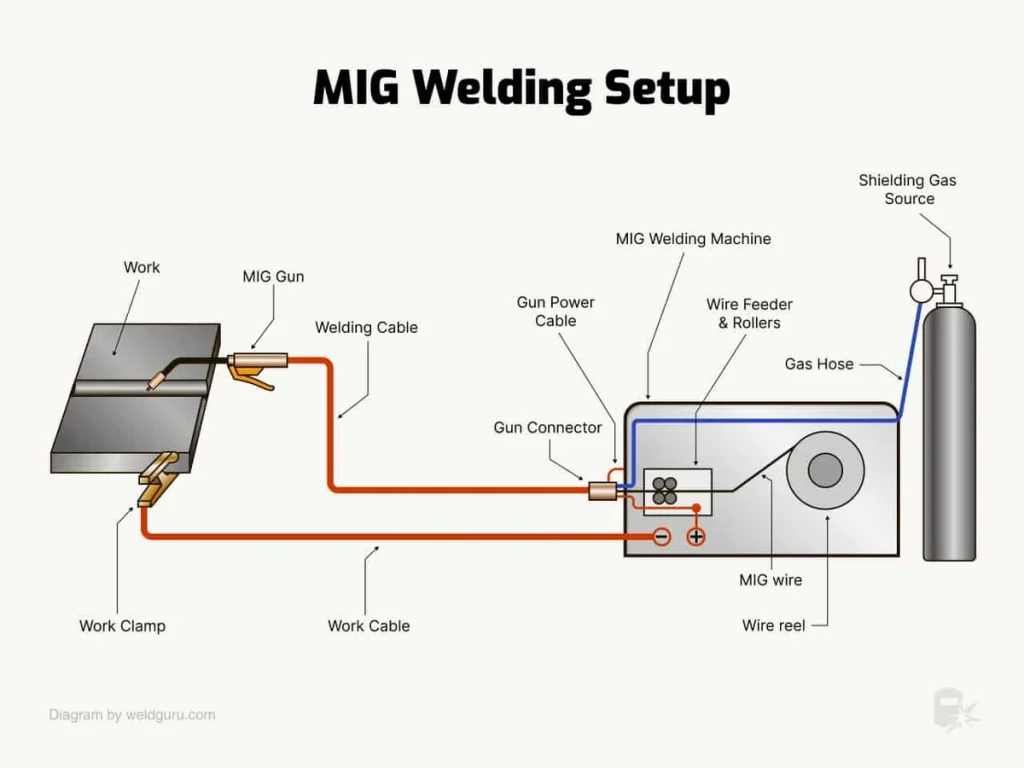
MIG welding, or Gas Metal Arc Welding (GMAW) as it's technically known, uses a continuous wire electrode fed through a welding gun. This wire is both the filler material and the electrical conductor. As you pull the trigger on the gun, the wire feeds out, and an electrical arc forms between the wire tip and the metal you're joining. This arc melts both the wire and the base metal, creating a molten weld pool that solidifies into a strong bond.
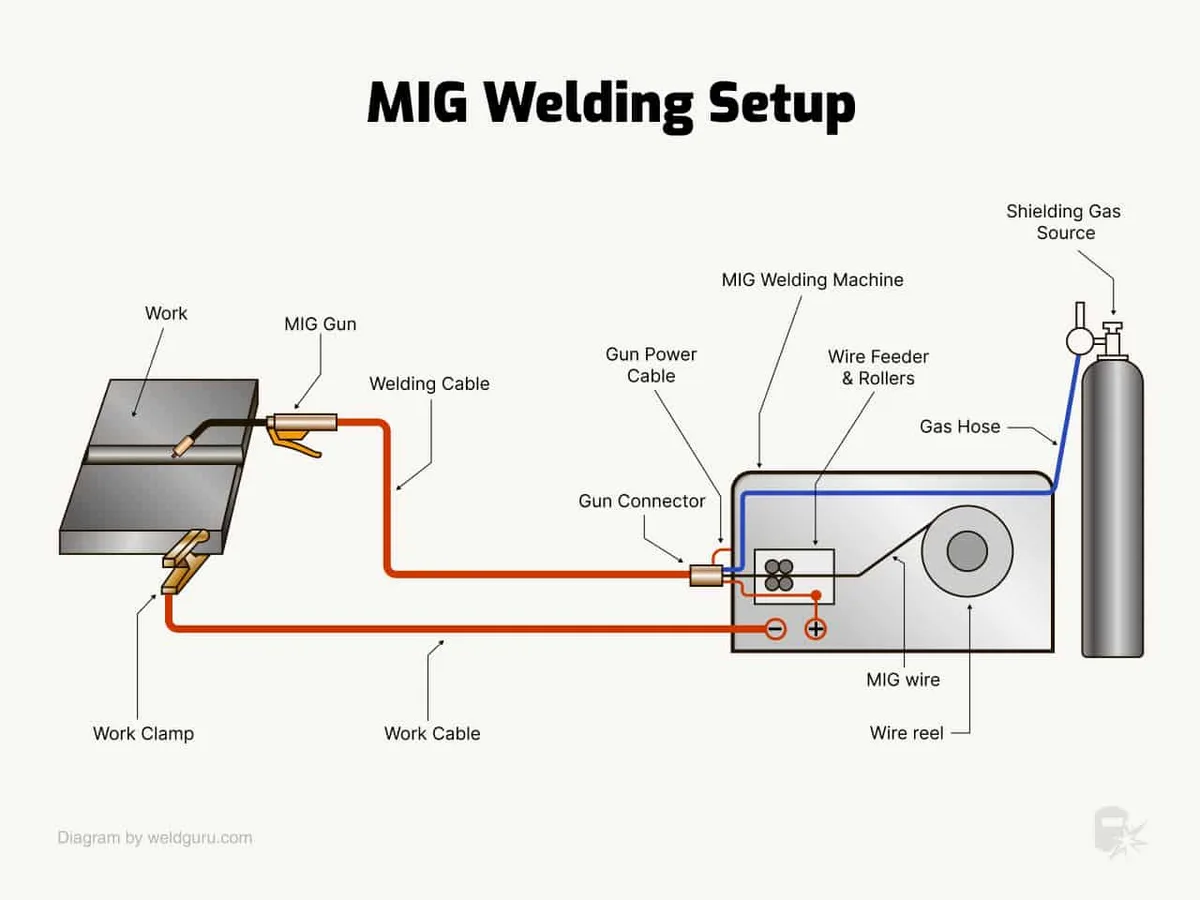
Image source: Bing (Web (fair-use with source credit))
The shielding gas, typically a mix of argon and CO2 or just CO2 for steel, flows from the gun nozzle around the arc. This gas protects the molten weld pool from atmospheric contaminants like oxygen and nitrogen, which could otherwise weaken the weld. The process is often described as "gun and go" because the machine manages the wire feed, greatly simplifying the welder's manual manipulation compared to other methods.
What Makes It Beginner-Friendly?
A key reason MIG welding is seen as easier is the continuous wire feed. You're not stopping to replace consumable electrodes like you do with stick welding. This means you can focus more on controlling the gun.
- Simplicity of Operation: The primary controls you'll adjust are voltage and wire feed speed (WFS). Once these are set appropriately, the machine does the rest of the work feeding the electrode.
- Less Mess: Compared to stick welding, MIG generates significantly less spatter and slag, meaning less cleanup required after you're done.
- Visibility: With a good auto-darkening helmet, you usually have a clear view of the weld puddle, making it easier to control.
- Versatility: It’s effective on a wide range of metal thicknesses, from thin sheet metal to thicker plate.
When MIG Welding Gets Challenging
While the basic act of pulling a trigger is simple, achieving consistent, high-quality welds, especially for demanding applications, introduces a learning curve. The difficulty spikes when you move beyond simple, flat joints.
Mastering Different Positions
Welding on a flat surface is one thing, but controlling that molten puddle when gravity is working against you? That's a skill that takes real practice.
- Overhead welding: Requires precise control to prevent the molten metal from dripping.
- Vertical welding: You need to manage the weld puddle progression, often using an upward or downward technique depending on the metal and amperage.
- Horizontal welding: Can be challenging due to the tendency for the molten metal to sag.
Getting clean, solid beads in these positions demands good technique, heat control, and a steady hand.
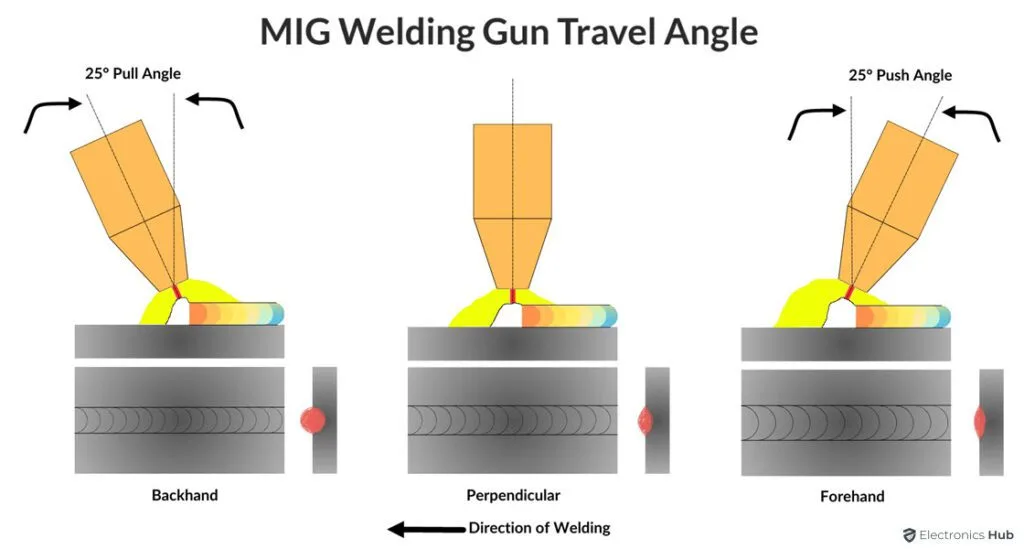
Image source: Bing (Web (fair-use with source credit))
Handling Various Material Thicknesses
Welding thin sheet metal without burning through requires a very delicate touch and specific settings. On the other end of the spectrum, achieving adequate penetration on thick structural steel involves ensuring your heat input is sufficient to fuse the base metals completely. For instance, welding 20-gauge sheet metal on a MIG setup is vastly different from welding 1/4-inch plate; the voltage and wire speed settings need to be dialed in precisely for each.
The Importance of Joint Fit-Up
Gaps are the enemy of good welds. If the pieces you're joining aren't aligned properly or there are significant gaps between them, it becomes incredibly difficult to create a strong, consistent weld. A well-fitting joint allows the filler material to bridge the gap effectively and fuse properly with the base metals. Poor fit-up often leads to welds with insufficient penetration or excessive reinforcement, both of which compromise structural integrity.
Fine-Tuning Machine Settings
While the basic operation involves just voltage and wire feed speed (WFS), knowing what those settings should be for specific materials and thicknesses is where expertise comes into play. Aggregate user feedback reports that mistakenly setting the WFS too high for a given voltage can lead to a "dirty" arc with excessive spatter. Conversely, too low a WFS can result in a weak weld with poor penetration. Understanding how to adjust these, along with the correct shielding gas flow rate, is crucial.
Information for this can often be found in welding charts, like those detailing welding chart mig wire.
Your Goals Matter: What Do You Want to Weld?
The perceived difficulty of MIG welding is directly tied to what you aim to create with it. A beginner can get proficient enough for basic repairs relatively quickly, but aiming for professional-grade fabrication opens up a much steeper learning path.
Simple Fixes vs. Complex Fabrication
For straightforward tasks, like fixing a broken bracket on garden equipment or welding a new piece onto a metal fence, MIG welding is quite approachable. You can learn the basics of laying a decent bead on flat surfaces within a few hours of practice. This level of skill might be all you need for occasional DIY projects.
However, if your goal is to build a custom exhaust system for a car, fabricate custom furniture with precise joints, or work on structural projects where weld integrity is critical, the bar for skill is much higher. These applications demand a deep understanding of metallurgy, proper joint preparation, welding techniques for all positions, and the ability to consistently produce welds that pass inspection. Achieving this level can take years of dedicated practice and learning.
For example, how to MIG weld exhaust pipe is a common DIY goal that requires careful heat management to avoid melting through thin exhaust tubing, a task that might be manageable for an enthusiast but requires finesse.
Keys to Learning MIG Welding
If you decide MIG welding is for you, approaching it with a good strategy will make the learning process smoother and more rewarding. It’s about building a solid foundation before tackling complex jobs.
Practice the Fundamentals
The most important advice is to practice consistently. Start with scrap metal of various thicknesses to get a feel for how different materials react to heat. Focus on developing a steady hand and consistent gun angle and travel speed. Manufacturer specifications, such as those found in a Lincoln welders settings chart, provide a starting point, but real-world practice is irreplaceable.
Seek Good Instruction
While you can find a lot of information online, hands-on instruction is invaluable. Consider taking a beginner's class at a local community college or a welding supply shop. This provides direct feedback from experienced instructors who can correct bad habits before they become ingrained. A good instructor can also guide you on selecting the right welding machine for your needs, such as a best budget 220v mig welder if you plan on tackling thicker materials.
Start with Basic Projects
Don't try to weld a trailer frame on your first day. Begin with simple, non-critical projects that allow you to focus on technique rather than complex problem-solving. Practicing on flat joints, making consistent beads, and learning to control the arc are all foundational skills. You can then gradually move to slightly more complex tasks, like creating lap joints or T-joints, before attempting anything that requires high structural integrity.
This methodical approach helps build confidence and competence without overwhelming you.
Common MIG Welding Mistakes to Avoid
Even with its user-friendly design, MIG welding has its pitfalls. Learning to recognize and avoid these common mistakes can save you a lot of frustration and ensure your welds are strong and reliable.
Not Cleaning Your Metal
One of the most frequent errors beginners make is not properly preparing the metal surface. Mill scale, rust, paint, oil, or any other contaminants on the metal can cause significant weld defects.
- Porosity: These contaminants get trapped in the weld pool as it solidifies, creating small gas pockets.
- Weak Welds: The weld won't fuse properly with the base metal, leading to reduced strength.
- Spatter: Contaminants can cause the arc to be unstable, resulting in excessive spatter.
Using a wire brush or an angle grinder with a flap disc is essential. Ensure your metal is clean and dry before you start welding.
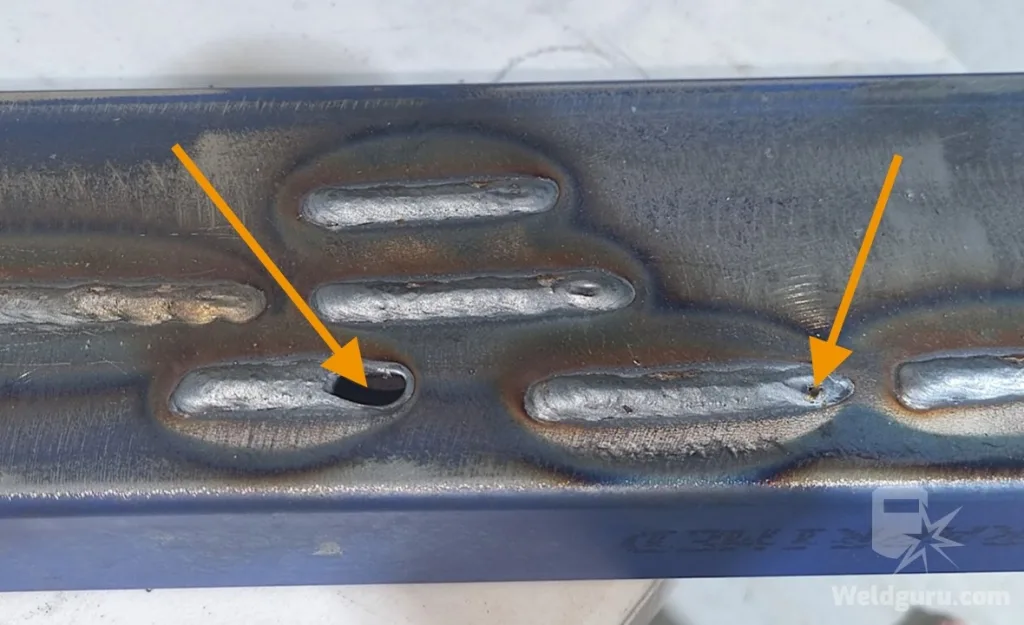
Image source: Bing (Web (fair-use with source credit))
Incorrect Wire Feed and Voltage Settings
As mentioned, the voltage and wire feed speed (WFS) are critical. Setting them too high or too low for the material thickness and type will lead to poor results. For example, on thin materials, too much heat (often from too high voltage or WFS) can cause the metal to burn through, creating holes. Conversely, insufficient heat will result in a weld with poor penetration, meaning the metals aren't fused deeply enough.
Consulting a welding settings for stick welding chart, or specifically a MIG chart, is your best bet for initial settings.
Bad Gun Angle or Travel Speed
The angle at which you hold the MIG gun and how fast you move it can dramatically affect weld quality.
- Gun Angle: For most steel applications, a slight push angle (the gun pointing slightly forward in the direction of travel) is preferred. Holding the gun too far back (a drag angle) can lead to more spatter and less penetration.
- Travel Speed: Moving too quickly can result in a narrow bead with poor fusion. Moving too slowly can cause the weld to become too wide, leading to excessive heat input and potential burn-through or inconsistent penetration. Aim for a consistent, steady movement that builds your weld bead appropriately.
Ignoring Your Surroundings (Safety First!)
Safety is paramount in welding, and neglecting it is a critical mistake. Always wear appropriate personal protective equipment (PPE), including an auto-darkening welding helmet (a best auto darkening welding helmet for the money can be a good investment), leather gloves, and fire-resistant clothing. Ensure you have adequate ventilation and a fire extinguisher readily available. Welding fumes can be hazardous, and sparks can easily ignite flammable materials.
When to Consider Other Welding Methods
While MIG welding is a fantastic entry point, it’s not always the best tool for every job. Knowing when to look at alternatives can save you a lot of headaches and lead to better results.
When Stick or TIG Might Be Better
Stick welding (Shielded Metal Arc Welding, or SMAW) is often favored for its ability to weld outdoors and on dirtier or rustier metal surfaces where MIG would struggle due to contamination. It's also excellent for thicker materials and structural work. Manufacturer specifications for stick electrodes often detail their performance in windy conditions, a clear advantage over MIG. If you're doing heavy fabrication outdoors or on less-than-pristine steel, stick might be the way to go.
Information on settings can be found in a stick welding amperage chart.
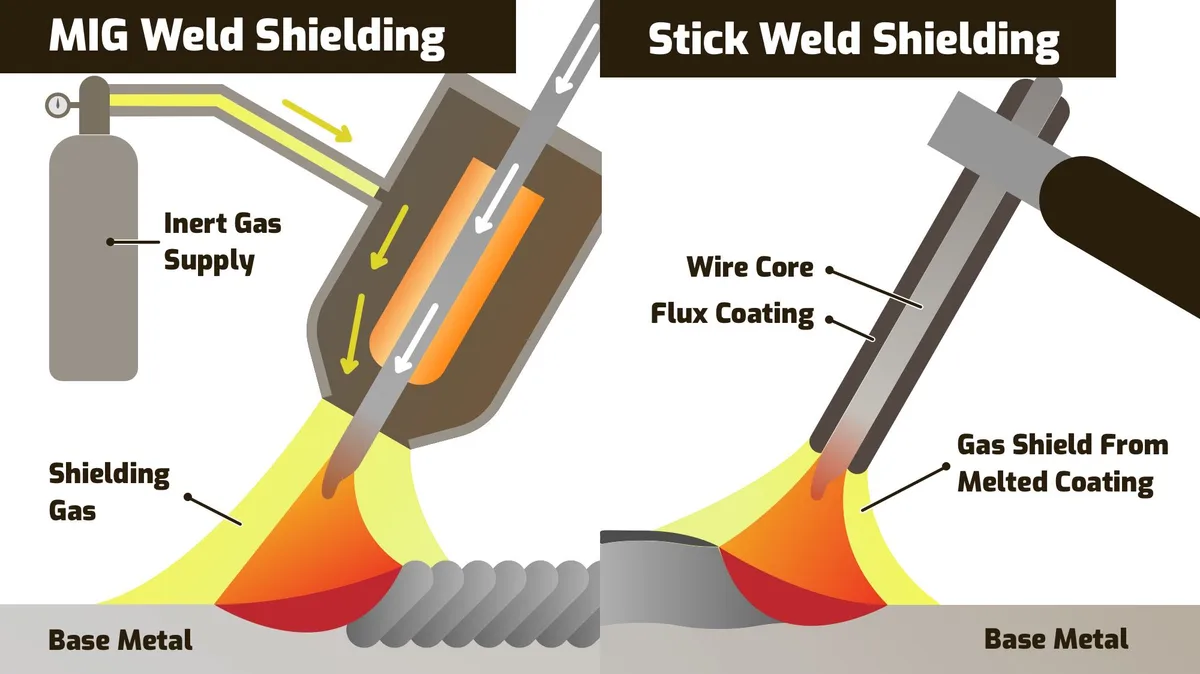
Image source: Bing (Web (fair-use with source credit))
TIG welding (Gas Tungsten Arc Welding, or GTAW) offers the highest level of precision and control, producing incredibly clean and visually appealing welds. It's ideal for thin materials, exotic metals like aluminum and stainless steel, and applications where weld appearance is critical. While TIG requires significantly more manual dexterity and patience, it offers unparalleled control over heat input. If you're looking to weld thin aluminum or create art-quality welds, TIG is often the preferred method, though its learning curve is considerably steeper than MIG.
For filler rod selection, a TIG welding filler rod selection chart is essential.
Ultimately, the choice between MIG, stick, and TIG depends on the material type, thickness, environmental conditions, and the desired quality and appearance of the final weld.


